
Translating
Once you have successfully created and populated your first project (see working with projects), you are able to browse through the translation relevant content.
When clicking on a project, you can first select which version you want to work on, and next which language you want to translate. If your target language is not listed here, click the Configure button in the toolbar to create a new one.

Browsing
Once your desired language is selected, you can browse the folders and translation files.
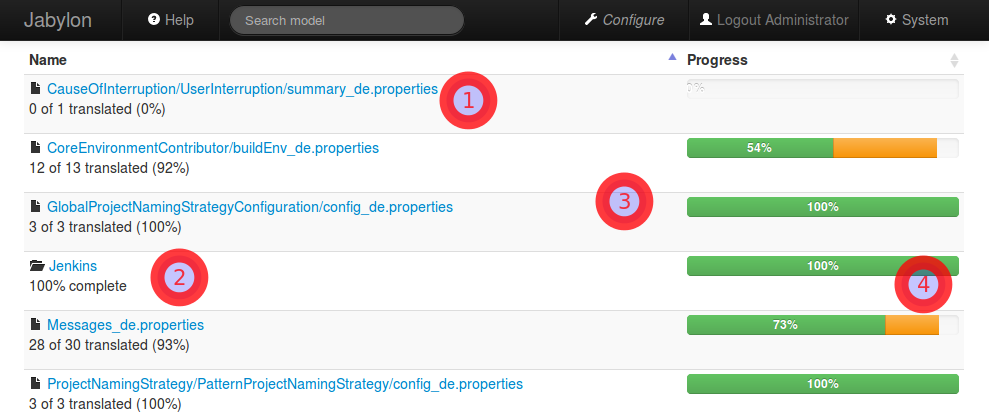
Depending on the icon, the link points to either a translatable file (1) or a folder that contains additional resources (2). The length of the progress bar (3) indicates your overall translation progress for that file/folder in the given language.
If parts of the progress bar are yellow (as can be seen in (4)) that means that some of the translations are considered fuzzy. That happens if e.g. the project uses automated translation checks and one or more translations fail one or more of the checks. You will be able to see exactly what is wrong with those translations once you open the files.
Clicking on the table headers will allow you to sort the contents ascending or descending on the given criteria. You can also use the table’s filter box to filter out resources that you are currently not interested in.
Overview
When clicking on a translatable file you will first see the overview page. This will show all available properties in the file. You will also find a Download button at the bottom of the page that allows you the download the current translations.
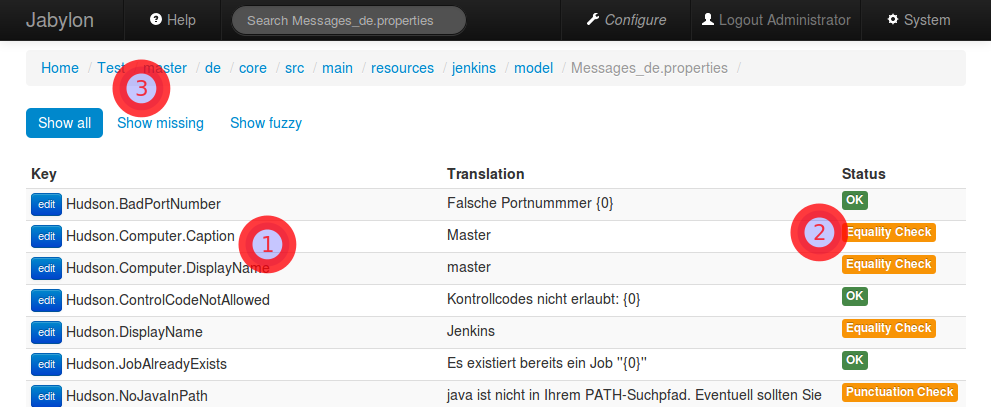
Each line (1) represents one key in the template language. On the right (2) you can see the status of the current translation. The green OK means the key is translated and passed all checks. Yellow indicates a fuzzy translation. This is usually the case if an automatic check failed for the translation.
The buttons on the top (3) allow you to filter which properties you are interested in. All means that all properties are displayed. Missing will hide all keys that have already been translated and fuzzy will only show missing and fuzzy properties (failed check).
Clicking the edit button on any of the rows will bring you to the actual translation editor.
Translation Editor
The translation editor is the center piece of Jabylon. This is where translators will spend most of their time.
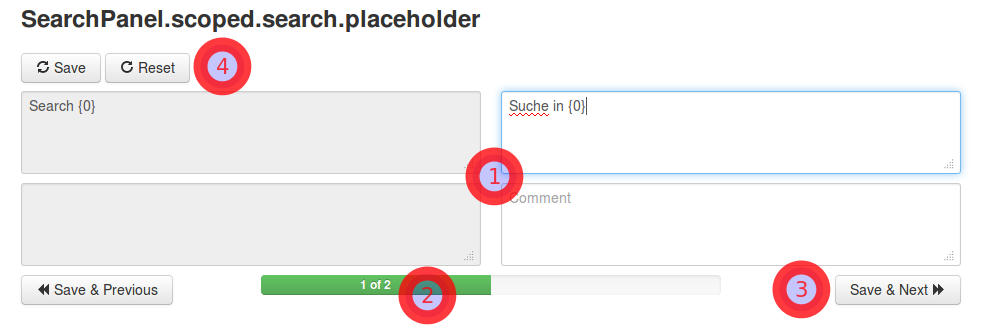
The central area (1) splits into the template part (left) and the translation part (right). The upper text area displays the translated/to-be-translated value and the lower text area shows any translator comments that might be associated with the value. Comments can be used for instance to give more context to the translator if the value alone isn’t clear enough without seeing the translation.
On the bottom (2) is a progress bar to give you an idea of how many more keys are left in the resouce you are editing.
When you are satisfied with the translation click Save & Next (3) to save your changes and advance to the next translation. Please note, for a faster workflow you can also use keyboard shortcuts for this.
On the top you will find two more buttons (4) Save and Reset. You can use those to revert your current change or to save without proceeding to the next property.
Translation Checks
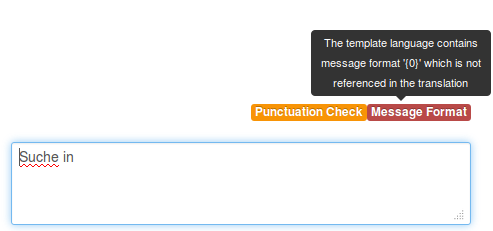
If your project is configured to execute automatic translation checks and the current translation fails for one or more of those, you can see this in the upper left corner. In the example of the screenshot, the template language was ‘Search {0}’. The {0} is an indicator that the application will insert a value at runtime into the string. The translation check now validates if the translation contains the right amount (and numbering) of replacement variables. In this case, it does not because the {0} is missing in the translation.
Non-translatable Properties
Sometime property files contain both translatable and non-translatable properties (e.g. a version number). To exclude non-translatable properties from checks and translations you can annotate the non-translatable properties. Simply put the @non-translatable annotation into the comment section of the non-translatable property in the template language. In a normal java properties file this would look as follows:
#some comment
#@non-translatable
version = 1.0.0
Translation Tools
Jabylon offers an extensible set of translation tools to support translators in creating good translations for the end user. The available tools can be seen at the bottom of the page.
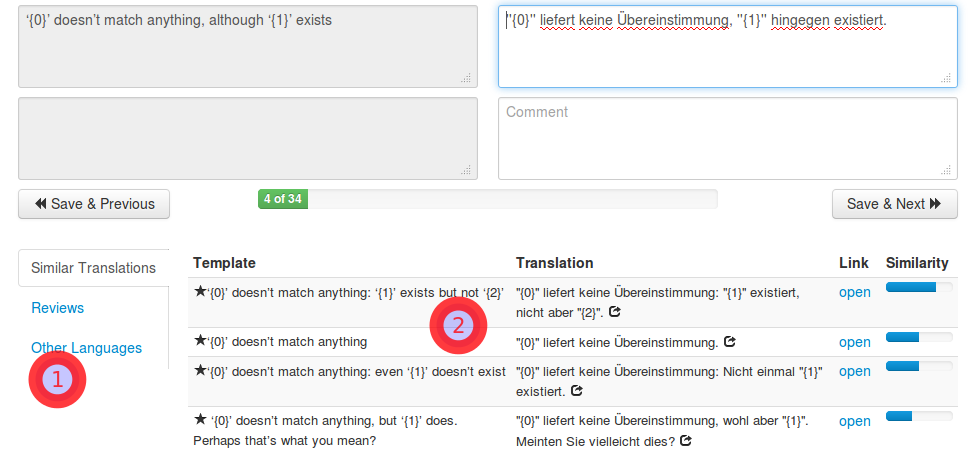
The tabs on the left side (1) allow you to switch between the different translation tools. You can also use keyboard shortcuts to switch between the tabs. The translation tool that can be seen (2) in the screenshot offers a selection of alternatives on how similar strings have been translated within your projects so far. This can be very useful to get an idea of how other people translated certain terms/phrasings so far and to keep things consistent.
Translation Memory
The translation tool available under “Similar Strings” grants access to Jabylons translation memory. It searches for strings that are similar to the one that is currently being translated and offers suggestions on how those have been previously translated into the target language. The translation memory fills automatically as you import projects or translate resources.
However if you already have a prexisting translation memory available in the TMX format you can import it into Jabylon. To do so, enter the Index configuration and upload your TMX files. Please note that it can take a few minutes before the new suggestions become available.
Keyboard Shortcuts
Since there is typically many translations in a software application, Jabylon is optimized for power users by providing keyboard shortcuts for the most common actions. The currently available shortcuts are:
- CTRL + Right Arrow = Save & Next
- CTRL + Left Arrow = Save & Previous
- CTRL + 1 to 9 = open the respective translation tool tab