Working with Projects
All translation work happens in the context of a Project. A project can contain one or more branches which in turn contain the translation templates and their respective translations.
Before you can start translating you need to create at least one project.
Creating Projects
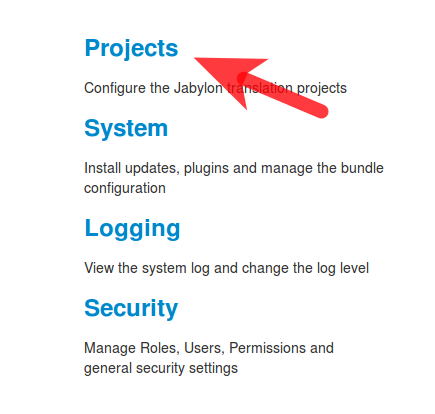
To create a project, click on the Configure link in the upper right corner.

This will bring you to the configuration overview to access the different Jabylon settings. To create a new project, select Projects.
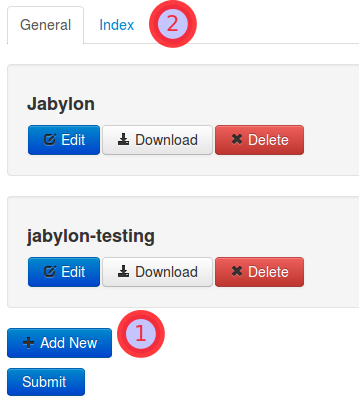
In the next form you will get an overview of the projects you have so far. You edit and delete them here or download the project as a zip archive. The second tab (2) gives you a hint about the current size of the search index and allows you to rebuild it from scratch if needed.
The Add New button at the bottom allows you to create a new project.
Configuring Projects
The project configuration is split among several tabs. You can switch tabs without submitting and without data loss.
General
In the General tab you can enter the project name, decide on the team provider you want to use (optional) and determine the project type.
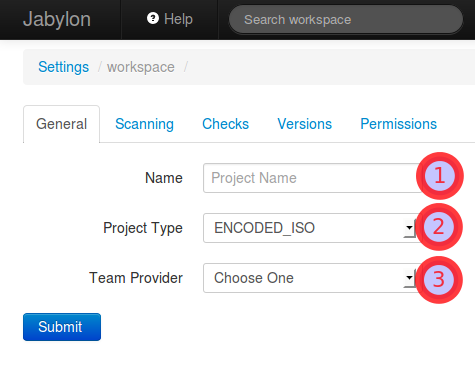
By default two types of projects are available: PROPERTIES_ENCODED and PROPERTIES_UTF-8. PROPERTIES_ENCODED is for typical java projects that use iso encoded property files. If you are unsure, leave this setting on its default. The other option PROPERTIES_UTF-8 is for non standard property files that use UTF-8 encoded files instead of unicode escapes.
Other project types, like ANDROID and iOS become available by installing additional plug-ins.
Scanning
The Scanning tab lets you configure which files are relevant for translation and how to interpret them. The exclude and include sections use the file glob syntax known from Apache Ant.
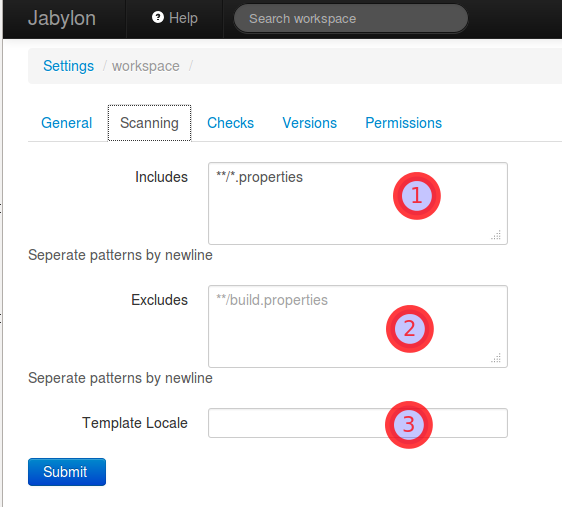
The Includes section (1) let’s you configure which files are translation relevant. The default is **/*.properties which means all files ending in .properties. You can enter multiple inclusion patterns here by separating them with a new line.
The Excludes section (2) let’s you exclude certain files even though they would be matched by an include rule. This is useful for instance to exclude configuration properties or unit test resources.
The Template Locale (3) let’s you choose which property file is your translation template. In most cases you can leave this field empty. This would cause Jabylon to expect e.g. a file called messages.properties to be the translation template and a file called messages_de_DE.properties to be a german translation for this file. However, there are some projects that do not use a dedicated translation template. In this case you should enter your template locale here. As an example, assume your main language is english and you externalize your strings into a file called messages_en_US.properties. In this case, enter en_US in this field to tell Jabylon that it should treat the en_US locale as the template for the other translations.
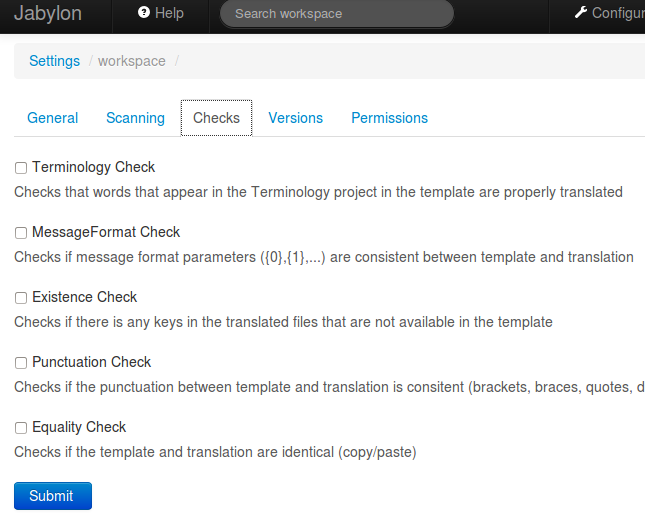
Checks
The next section configures automatic translation checks. These checks are automatically executed when translations get changed or when you rescan your project. If one or more of those checks fails for a specific translation, the translation gets annotated with the error message and the translation is marked fuzzy.
Versions
The Version section gives you an overview about the versions that are configured in your project. Typically each version maps to a branch in your source code repository. If you have a team provider configured, then the name of the version decides which branch is checked out of the source code repository.
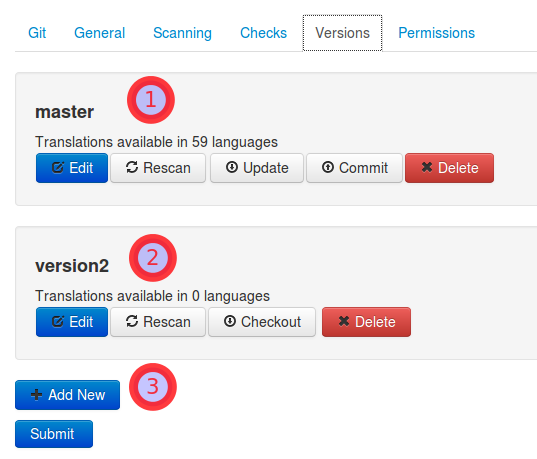
Which buttons are visible and enabled depends on the state of the version and the project configuration. (1) Shows a project that uses a Git team provider configured and master branch is already checked out. You can
- edit to add or remove languages
- rescan to let Jabylon reparse all files in the project
- please note that it is normally not necessary to do a rescan after you update the project. Jabylon will incrementally update itself when files are added or updated.
- update receives and code changes from your SCM and processes the diff incrementally to update the statistics
- commit commits all translations to the source code repository (Git in this example). If you use Git as team provider this really means Commit and Push
- Delete deletes this project and all files on the local disk. This operation is not reversable.
(2) Shows a version that has not been checked out yet. Instead of Update and Commit there is a single Checkout action that will fetch the specified branch from the team provider. Please note that you do not have to connect Jabylon to a source code repository. You can also just copy the relevant files into the workspace (or upload them through the JSON API) and manually trigger a Rescan if those files change.
The Add New button (3) can be used to create a new version of the project. If you just created the project and have not submitted yet, this button is disabled. To create a new version, first submit your new project.
Git
The Git section lets you configure a remote Git repository that contains your project sources. Please note that you need to select Git as the project’s team provider and submit your change for this tab to become visible.
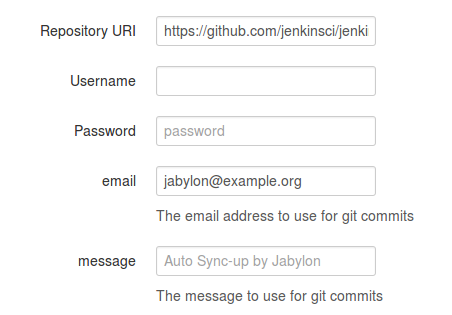
The only mandatory field is the repository URI. Here you should enter the clone URI for your Git repository (e.g. https://github.com/jutzig/jabylon.git). If your Git repository requires authentication, you must also provid a valid username and password. The email and message fields are optional and only affect the Git commits that Jabylon produces when you execute the Commit action.
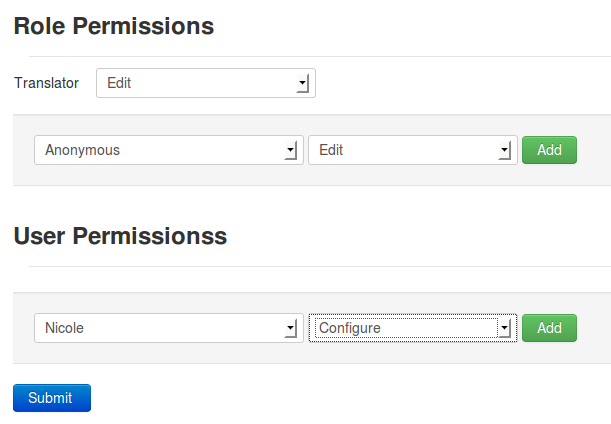
Permissions
The Permissions lets you configure the access rights for your project. You can assign fine grained access permission on both per role and per user base. For more on access permissions consult the Security section.